Using Business Central as your Business Inbox in Outlook
Business Central offers an add-in that lets you manage business interactions with your customers and vendors, directly in Microsoft Outlook. With the Business Central add-in for Outlook, you can see financial data related to customers and vendors, and create and send financial documents, such as quotes and invoices.
Business Central add-in consists of two separate add-ins that provide the following capabilities:
Contact insights
This add-in lets you look up Business Central customer or vendor information in Outlook emails and calendar appointments. It also lets you create and send Business Central business documents, such a sales quote or invoice to a contact.
Document view
When a business document is sent in an email, the add-in provides a direct link from email to the actual business document in Business Central.
Get started
The first thing to do is get the Business Central add-in installed in Outlook. Your administrator may have already installed the add-in for you. So if you're not sure, check with your administrator or see the next step to verify whether it's installed.
If the add-in hasn't been installed for you, see Install the add-in for your own use.
With the add-in installed, you can access the Business Central add-in from any new or existing email message or calendar appointment in Outlook.
Start by signing in to Outlook and opening an email message. Then, if you're using the Outlook app, go to the ribbon, and look for Business Central. Or if you're using Outlook on the web, at the top or bottom of the email message, look for
 or go to the more actions
  button.
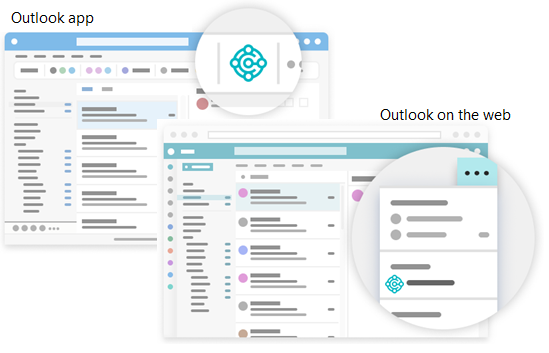
If you've installed the add-in on your own and chose to get a sample email, check your inbox for the welcome email. This email provides information to help you get started.
The first time you use the add-in, in Business Central add-in pane, you might be asked to sign in. In this case, choose Sign in now and follow the instructions onscreen to sign in to Business Central using your account.
Tip
If you use the new Outlook on the web, you can pin Business Central so that it is always immediately visible, instead of having to go to the more actions button, making it convenient to view contact insights while you browse through different emails.
For more information, see Using add-ins in Outlook on the web.
Work with contacts and documents using the Contact Insights add-in
Let's say that you get an email from a customer that wants to get a quote on some items. Directly in Outlook, you can open the Business Central add-in, which recognizes the sender as a customer, and opens the customer card for that company. From this dashboard, you see overview information for the customer, and can drill down for more detail on specific documents. You can also dig into the sales history for the customer. If it's a new contact, you can create them as a new customer in Business Central without leaving Outlook.
In the add-in, you can create a sales quote and send it back to this customer without leaving Outlook. All of the information that you need to send the sales quote is available in your business inbox in Outlook. Once you have the data entered, you post the quote and send it by email. Business Central generates a .PDF file with the sales quote and attaches it to the email message that you draft in the add-in.
Similarly, if you get an email from a vendor, you can use the add-in to work with vendors and purchase invoices.
Sometimes you want to see more fields than you can see in the add-in, such as when you want to fill in lines in an invoice. To give you a bit more space to work with, you can pop out the add-in to a separate page. It's still part of Outlook, but you have more space. As you enter data for the document in the pop-out view, the changes are automatically saved. The following sections lead you through some basic tasks to give you a general understanding how to use it.
Tip
The tasks explain how to use the add-in from an email message. But you can do the same from a calendar appointment in Outlook.
Look up a business contact when composing an email
Create a new email message.
In the ribbon, go to Business Central and choose Contact Insights. Or if you're using Outlook on the web, go to the bottom of the message, choose
> Contact Insights.In the Business Central add-in pane that opens, scan for and choose the contact you want.
An overview of the contact displays in the pane and the contact is added in the To line of the email.
View and change the contact details or switch company
The action bar at the top of the Business Central add-in pane includes several actions that let your dig deeper into details about the contact and change things.
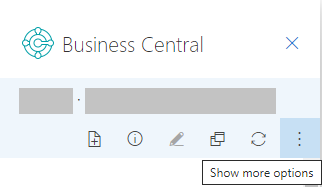
For example, you can open the full contact details as you would see them in Business Central. If you work with more that one Business Central company, you can easily switch between companies.
Track incoming documents
Perhaps you use the Incoming Documents list in Business Central to track documents for processing that vendors send to you, such as a purchase invoice that needs to be paid. If you do, you can easily create Incoming Documents records from the Outlook add-in and include the email attachments.
When you receive an email from a vendor that has an attachment, choose
Business Central > Contact Insights.In the action bar of the add-in, choose Show more actions, then choose the Send to Incoming Documents….
Create and send new document to a contact
- In the ribbon or at the bottom of the email message, choose Business Central > New, then choose the type of document you want to create, such as Sales Quote.
- Make changes to the document in the Business Central add-in pane.
- When the document is ready to send to the contact, in the action bar, choose Show more actions, then choose the Send by Email action.
View a document from an email using the Document View add-in
Whether it's an email you sent or received, you can surface any Business Central document, like the sales quote, directly in Outlook. From there, you can make changes and navigate to related information—just as you would from within Business Central.
If you're using the Outlook app, just choose Document Link at the top of the email message. For Outlook on the web, look for the document reference link in the email message. The reference link text will include the document number, which is based on the number series used in Business Central. For example, the link for a sales quote would be something like Sales Quote S-QUO1000.
See Related Training at Microsoft Learn
See Also
Getting Ready for Doing Business
Getting Business Central on my Mobile Device
Send Documents by Email
Finance
Sales
Purchasing
Minimum Requirements for Outlook
Using add-ins in Outlook on the web